
There have been a few great addiction added to the Lakebook page that are in the below.
The Deeper sonar is so much more than a fish finder or feature locator. You can combine all your recordings on the Lakebook online page, you can review the whole lake and get a greater understanding of your quarry.
With the Lakebook you get to understand the topography of the lake, the hiding spots, interception routes, and the underwater highways, at a quick glare.
The members of my syndicate will often kindly let me know which areas are being fished before I arrive. So, armed with the weather forecast and the watercraft knowledge I have, I will study the Lakebook before I even leave home. This gives me the ability to head straight for my perfect location and saves me a lot of time. This day and age of a fast-paced lifestyle, you can get the upper hand over other anglers and formulate a plan of action.
I use the Lakebook on my mobile phone and home computer. Due to the smaller screen on the phone, I use it in a slightly different way to get the best of all the features. It’s simply because of the size of the screen that I have adopted a couple of tricks to simplify the process. In reality, it’s the same process no matter what the size of the screen is.
Step – 1
Open up your Internet browsers and open the Deeper Lakebook page from my favorite and log in.
![Screenshot_20190121-143620_Chrome[1].jpg](https://richardhandel.com/wp-content/uploads/2019/01/screenshot_20190121-143620_chrome1.jpg?w=429&h=857)
Step – 2
Then click on the Venue you wish to view (in this case the top one)
![Screenshot_20190121-143641_Chrome[1].jpg](https://richardhandel.com/wp-content/uploads/2019/01/screenshot_20190121-143641_chrome1.jpg?w=428&h=855)
This will have made the map drill down on the area you wish to view. This helps if you’re traveling long distances for your fishing and/or the venues are spread about the countryside.
Step – 3
Click on the X next to the Lakebook, this will minimize the screen and make better viewing on the mobile.
![Screenshot_20190121-143651_Chrome[1].jpg](https://richardhandel.com/wp-content/uploads/2019/01/screenshot_20190121-143651_chrome1.jpg?w=473&h=945)
Step – 4
Now by using the + or – situated on the right-hand side near the top of the page. You will be able to zoom in or out just by opening & closing your fingers as you would do on your mobile.
![Screenshot_20190121-143726_Chrome[1].jpg](https://richardhandel.com/wp-content/uploads/2019/01/screenshot_20190121-143726_chrome1.jpg?w=569&h=1137)
Step – 5
You have a couple of choices now to view the area you fancy fishing.
A – Click on the rod & reel by your selected spot, this will give you a blue outlined area. This would have been mapped at the time you recorded the swim using the onshore mode (instructions below on how to set up).

This brings up the area you have selected and the sonar view of the lakebed and any fishing found. You can speed this sonar view by pressing the play button until it gets to 10x speed.
Step – 6
Now, this is where a little trick helps when using your mobile if you turn the phone to landscape view, it will only show the sonar part of the screen.

If you scroll along until you find a feature or fish that you wish to cast to and then flick the screen round to Portrait view.

Step – 7
Tap the screen where you see the fish/feature, a line will appear and the deeper will have moved to the location that you are interested in.
![Screenshot_20190121-150904_Chrome[1].jpg](https://richardhandel.com/wp-content/uploads/2019/01/screenshot_20190121-150904_chrome1.jpg?w=524)
Step – 8
I find that if you need to know the distance from the bank to this spot, it’s best to flick over to map view, instead of satellite, as it easier to find you standing point (swim).
This is done by clicking on the satellite button and then selecting map view.
![screenshot_20190121-151453_chrome[1]](https://richardhandel.com/wp-content/uploads/2019/01/screenshot_20190121-151453_chrome1.jpg?w=461&h=921)
and you now have the ability to measure the distance from the shore to where the Deeper icon is located in the water.
![Screenshot_20190121-151508_Chrome[1].jpg](https://richardhandel.com/wp-content/uploads/2019/01/screenshot_20190121-151508_chrome1-1.jpg?w=477&h=981)
Step – 9
Measuring the distance – firstly, minimize the viewing style, which will let you use the rule, this is located below the map/satellite tap.
![screenshot_20190121-161501_chrome[1]](https://richardhandel.com/wp-content/uploads/2019/01/screenshot_20190121-161501_chrome1.jpg?w=446&h=891)
click on the rule, it will turn into an x. You then press on the screen your location and then on the Deeper, this will draw a line from point A to B.
![screenshot_20190121-161855_chrome[1]](https://richardhandel.com/wp-content/uploads/2019/01/screenshot_20190121-161855_chrome1.jpg?w=473&h=972)
This gives you the distance in meters & feet. If you need to, you can turn the screen back to satellite view. This will enable you to cross-reference with horizon markers on the far bank.
![screenshot_20190121-162322_chrome[1]](https://richardhandel.com/wp-content/uploads/2019/01/screenshot_20190121-162322_chrome1.jpg?w=455&h=909)
you can zoom if you need to on larger venues.
![Screenshot_20190121-162343_Chrome[1].jpg](https://richardhandel.com/wp-content/uploads/2019/01/screenshot_20190121-162343_chrome1-1.jpg?w=535&h=633)
Part -B
The other way is to view the whole lake and click on the map to obtain the depth. You will need to follow step 1 to 4. Then you can tap on the page, review the topography and choose the best area, like the drop offs on the side of a small island.
![Screenshot_20190121-164205_Chrome[1].jpg](https://richardhandel.com/wp-content/uploads/2019/01/screenshot_20190121-164205_chrome1.jpg?w=438&h=875)
And simply follow step 9 onwards
The beauty of being able to do this on the bank, it is extremely handy and can benefit your fishing a hundredfold. Basically, if you have your phone with you, you can tinker with the Lakebook, on the bank, at home, on your lunch break, if the weather is pretty rubbish and you just want to get on with your fishing, the Lakebook is certainly the way forward. This is why I love the Deeper Lakebook online page so much. Below are a few perfect spots I have found whilst sitting at home looking over my recordings later, these can easier be missed when you are in a rush and want to get fishing.
This image picked up a lovely slope, with a couple of nice edges where fish would patrol along. A perfect spot for bait.

This screenshot has picked out a couple of depressions in the lake. Another perfect spot and unless you were extremely lucky, you would never find them with a marker float set up.

This final screenshot depicts a steady incline from 11 ft up to 9.4 ft. Again is another likely area that fish would patrol along.
Once you have completed mapped the lake and even understand what is out there. I would still get the Deeper out and flick it out into your chosen area and double check your spot. This is a very good idea in the summer months when there is plenty of weed growth. It’s also very handy in the winter to find any new areas where the fish have been cleaning or even new silty spots if the carp have been digging up the bottom and making any new feature.
Here’s a quick Carp Fishing Tip
When casting the Deeper out and you find the perfect spot, I flick the marker out and retrieve the Deeper. I then cast a lead to the spot and clip up. I clearly don’t want to hit the Deeper with a lead! This is also a good way to get accurate baiting up with the Catapult or spomb.

How to set up onshore GPS mode. This is very important, as is a key part of getting your recording on to the lake book.
Step – 1
Open up the Deeper on your mobile or tablet and click settings

Step – 2
select Sonar mode: On Shore Gps

Step – 3
Then make sure that OnshireGPS Mode (pro+only) is ticked

How to download to Lakebook
Step – 1
Open up the Deeper on your mobile or tablet and click history
Step – 2
This will bring up a long list of recordings
![Screenshot_20190122-162957_Deeper[1].jpg](https://richardhandel.com/wp-content/uploads/2019/01/screenshot_20190122-162957_deeper1.jpg?w=640)
The ones that have names against them, I have already uploaded and I have renamed on the Lakebook. The one which reads Onshore GPS, needs uploading, which will auto-download depending on your setting (which I will cover below). As you can see there is a circle in the top right-hand corner, this indicates that you recoding is uploading and once it has done, the cloud icon will have a tick, as you can see.
You will also notice that the bottom recording (New point & Vincents) is not high lighted, this denotes that the recording has been deleted from your device. This will save storage if needed, they can be simply downloaded again as and when you need.
![screenshot_20190122-164727_deeper[1]](https://richardhandel.com/wp-content/uploads/2019/01/screenshot_20190122-164727_deeper1.jpg?w=640)
Just tap on the screen and you then hit yes, if you need to save storage space, press on the recording you do need and it will be highlighted in grey. A trash icon will be in the top right corner.
![screenshot_20190122-164659_deeper[1]](https://richardhandel.com/wp-content/uploads/2019/01/screenshot_20190122-164659_deeper1.jpg?w=640)
Then you have a choice of deleting from the App or both.
![screenshot_20190122-164712_deeper[1]](https://richardhandel.com/wp-content/uploads/2019/01/screenshot_20190122-164712_deeper1.jpg?w=640)
Helpful Hint
When doing mapping, I always just put the deeper in the margin to make sure its connected properly. You don’t want to cast it out on the perfect spot and find the atmospheric conditions will delay connection. You don’t want to disturb the fish too much.

Download Setting
Step – 1
Open up the Deeper app and select settings
Step – 2
Then tap Sync settings
![Screenshot_20190122-171101_Deeper[1].jpg](https://richardhandel.com/wp-content/uploads/2019/01/screenshot_20190122-171101_deeper1.jpg?w=640)
Step – 3
Choose which option suits you.
![screenshot_20190122-170948_deeper[1]](https://richardhandel.com/wp-content/uploads/2019/01/screenshot_20190122-170948_deeper1.jpg?w=640)
I hope that I have covered everything you need to know about the Lakebook. I can safely say that I wouldn’t be without this feature, as it certainly helps me put fish on the bank. My best advice is to study it as much as possible, it will reveal some hidden treasure. The more you map and download the better it gets. I have uncovered some hidden spots and overturned some areas that were supposed to have one type of feature like a gravel bar, but it tuned out to be more a hump/dip.

My best example of how the Deeper helped.
I had struggled to catch anything from the left-hand the side of this particle swim and I spent a long time getting this right. I came across it one day when I was looking over my Deeper recorded and I noticed a perfect spot. At the next opportunity, I was in that swim and it produced this lovely mirror and a couple of other fish.
I have found the deeper very useful with my perch & pike fishing, even on the river & small lakes. You are able to locate the baitfish, this certainly saves a lot of time.

This spot just off the old dead pads, the Deeper picked up a shole of bait fish and produced this lovely Perch.
![screenshot_20180908-191016_deeper[1]](https://richardhandel.com/wp-content/uploads/2019/01/screenshot_20180908-191016_deeper1-e1548846488939.jpg?w=557&h=282)
One of three Perch that day, I was very happy with that.

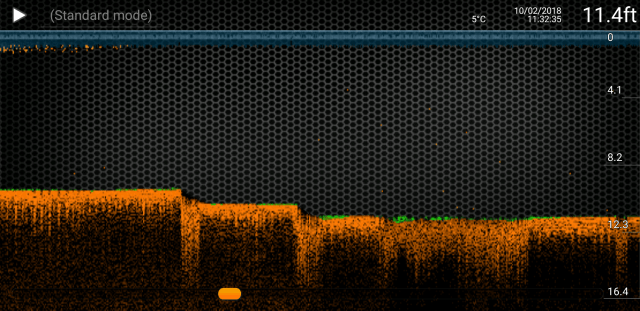
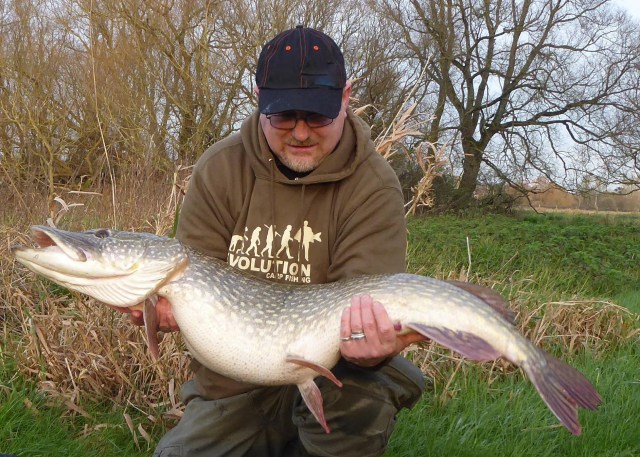
I have also found that on the river the Deeper is very helpful, it can save you a lot of time. If there is no bait fish in the perfect looking spot, there is no point in flicking a bait out. Below is a spot on the river which has produced some lovely Pike.

You can see from the Deeper view, there is a lovely bowl which holds the bait fish and the Pike do favor spots like this.

Not a bad pike of my efforts.
Hope this helps
Regards Richard